Showing posts with label tutorial. Show all posts

Thursday, 2 May 2013

Hairstyle- Side ponytail with curls

Here is a hairstyle I had a go at today. It's the first time I've done it but as I had some spare time I though I'd try something different. Let me know what you think, even if you think it looks crap! (Although maybe sugar coat it for me ;) )

Side ponytail with curls and a plait.
Firstly I started by plaiting my hair at the front and then securing into a side ponytail. I think I need to practice my plaiting and French plaiting skills but this will do for today!

I then carefully used my Enrapture Extremity heated rollers in the ponytail and left for 10-15 minutes whilst I tidied up etc.
The rollers in (& slightly heavy!)
With the rollers out I ran my fingers through and sprayed with hairspray.
Up close


For those of you thinking - 'err maybe don't go out in that disgusting white vest!'
Don't worry I didn't! Even though I went to the cinema I still made a little effort with the clothes! Here's my outfit and the complete look


Monday, 4 February 2013

Green and pink french manicure tutorial


Quick Tutorial on my green and pink French manicure - 

Step 1 - Use a light pink base colour as you would a normal french manicure. I've used Nails Inc in Warwick Avenue (I've now started singing this song in my head non stop!)


Step 2 - Once the base colour is dried I carefully used Rimmel 60 seconds polish in Sky High for the tips. Make sure it's fairly neat and evenly coloured. 


Step 3 - Using my Nail Art Pen in bright pink I went along the green at the bottom lining it. I like this as it gives an extra brightness and can help tidy up the mess slightly if you're not always neat. Finish with top coat and you;re done! 


Hope you like the pictures! I love doing my nails and giving and getting nail art inspiration. Tweet me your nail pictures too!

Maria xx


p.s. Sorry about the plaster in the pictures but I have burnt my finger cooking and you really don't need to see what is underneath!


Sunday, 20 January 2013

Everyday Make Up Look

Everything I used.


Hi, another day in the snow!! I thought I'd post my everyday make up today to see what you thought, (feel free to comment, as long as you're not here to be too mean!). This is the look I go to when I'm in a rush as I know exactly what to do so it takes very little time but I think I still end up with a natural but polished look. 
The overall look.

How I did it...
Firstly I made sure my face was cleansed, toned a moisturised of course. Every girl needs a clean base to start with. Then I used Rimmels wake me up concealer under my eyes and on my blemishes. It would be ridiculous to pretend I didn't have them and unfortunately, depsite my best efforts I still get the occasional breakout. I find this concealer gives good coverage without looking like it's been put on with a shovel.

Next I used one pump of Rimmels wake me up foundation. I applied with my fingers, blending all over to make sure I didn't leave any marks. Using a hand held mirror as well as a dressing table mirror furhter away helps me with this. That way I can see as close up as possible and also what people who aren't invading my personal space are seeing!


Next was Benefits High Beam on my cheeks and between the brows. I also used a very tiny amount under my eyes to brighten them. I have seen people use lots of highlighter under their eyes and I think it just looks too bright, white and if I'm honest - mental!


Now my face has good even coverage and an almost look of flawlessness I use Bella Bamba blusher from Benefit to give me some colour. I really like this colour for my skin tone and complexion. Then I use Rimmels waterproof gel liner in black. I make sure I follow the lash line carefully and slowly and then finish with small flicks upwards for the day time. Flicks and liner that are too big need eye-shadow and false lashes on me otherwise it all looks out of proportion! This gel liner is really easy to use, it's not like a pencil which can be too dry and it's not as slippery as liquid liners which I can get into a bit of a mess with, and nobody wants that.


This is followed by a quick coat of Scandaleyes mascara in black, I've lost my benefit They're Real - HELP!! This gives a nice colour and can lift they eyes for a subtle look. I then finish by using Rimmels Lasting finish lipstick in heart breaker. I apply it with a brush for the day so it's no too intense. 


That's it! Takes toughly five minutes and in my opinion makes me look less scary than a bare face! Just because I feel tired doesn't mean I need people to know about it, especially in my job.


The lips up close looking very subtle but not too plain. I look a bit washed out if I have nothing on my lips at all. The necklace is new too. I bought it in the Dorothy Perkins sale for £3 on Friday  A bargain and very cute, a statement necklace, which I love.


Close up of my eye, lined with black liner and a quick and simple coat of mascara. Of course there are some concealer products here as well, no ones perfect after all and I don't use photoshop so it's needed!!


The finished look again. Subtle make up but I feel more confident and look less tired. Might be time to go and play in the snow now and build a snowman. I'll then need a large coffee, a sofa and a movie to warm up. Might even make casserole for dinner later. Perfect winter day!


Maria xx

Saturday, 19 January 2013

Big hair! - heated rollers tutorial

Hi, hope anyone reading this is having a good weekend and not too affected by snow if you are in the UK. For Christmas I finally got some Enrapture Extremity Heated Rollers and I love them!
Picture from - enrapturehair.com

They heat up in less than 5 minutes and are easy to use. The roller and the clip are both heated so they are good to use on my thick hair. You get 10 medium sized rollers and 10 larger rollers to create waves, bounce and volume. I realise I'm starting to sound like I work for them, (I don't), so I'll show you the before, during and after process for using them. 


Here is the before. Please excuse the lack of make up and my grumpy face but it's the only picture I have! Luckily the lighting doesn't show up the bags under my eyes too badly! I have washed and blowdryed my hair and added Tresemme heat protection spray and some John Frieda blonde volumising mousse to help keep the style in place.

I put the rollers in starting by sectioning my hair in half to each side, making sure I had no tangles, which can be a complete chore for me. I then put a mix of the roller sizes in the top then bottom section of the hair. I made sure that the rollers on top were as close to the top of the roots as well to avoid a kink at the top. I then did my make up and they had cooled by the time I finished, roughly 10 minutes. Below is the result...


 In my opinion my hair looks much bigger and has more volume in the top. Love the curls and how my hair looks. I finished it off with Pantene Strong Hold Hairspray. Personally I love pantene hairspray and always use them. I have tried others but these seem to be the best for my hair.
 I hope you like the result too, let me know what you think by commenting below. xx


Friday, 4 January 2013

Friday night make up

After another day of exercise and diet I'm going out tonight with friends. I managed some cardio/aerobic dancing with toning and stretching exercises. If I keep this up I reckon in a month or 2 my body will begin to show the results. I'm sure ill start feeling benefits before though.

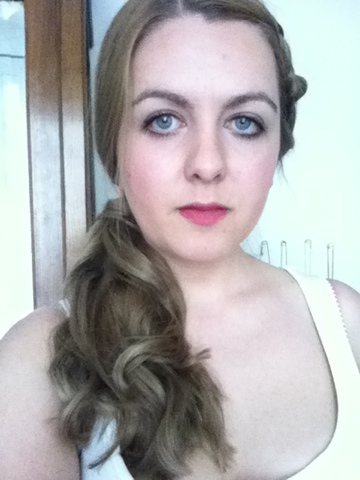
Off out for dinner tonight so have decided to wear a marroon pleated skirt and plain top. Yet to decide which jewellery but as I'll wear my tan boots it will be gold. Bearing this in mind I tried out a gold/plum/brown smoky eye. Here it is!!


Here is how I did it:
My 'makeupless' eye. 


The Sephora eyeshadow pallette used.


Start by putting the light beige/silver/white colour at the top of your eye near the eyebrow. Focus mainly on the outside and only use a small amount near the bridge of your nose.

Next I used the dark goldy brown colour on the lid near the corner of my eye. I worked it to about half way across the eye. Make sure when applying shadow you tap or gently blow excess powder off the brush otherwise it will end up on your cheeks!

Then I used the red/plum colour on the edge of my lid carefully blending it to the centre so the two colours are blended and not leaving a line. Use more or less as required.
The final result with mascara. (Benefit They're Real)

Hope you like it!